blur

blur

Thursday 30 October 2014

lights!~

hello hello!
     SO! We were out & about & traveling between cities, so on the drive home i got to do one of my favourite things! take pictures of lights!  I am linking these suckers from my flickr account, behold:


     Once we got further into the dark there was a bit more chance for experimentation!


     And I really like these ones!


Fun stuff! see ya!

Tuesday 28 October 2014

Happy Halloween!!! ~trick or treat~ cupcakes!

     I love halloween!  such a fun holiday.  I am hoping to go out trick-or-treating with my nieces this year & even bought a snazzy blue wig for the occasion.  I am really hoping it is not snowy & cold.  I am taking pottery class & this has given me an excuse reason to make halloween cupcakes! for people!  Yay!
     So, i am a sucker for cupcake liners & as soon as dollarama started putting out their halloween stuff i have been eying their halloween cupcake liners!  I already have quite a bit of large liners so i just bought some small ones.  I got some with spooky eyes! & these silly skeletons:


     But i guess i was using my thinking brain 100% because i decided to make chocolate cupcakes & while chocolate cupcakes are super delicious they make most fancy cupcake liners essentially useless.  Ooooh well.  You can sorta see the design when you take the wrapper off!
     This did not spoil my plans however because my main inspiration for my halloween cupcakes was... pop rocks!  oh yes. Or, well, popping candies that i got from dollarama for $2.


The cupcakes i made were the dark chocolate cupcakes from Comfort Cooking's Dark Chocolate Cupcakes with Meringue Ghosts (super cute!) & a super basic cream cheese icing (4oz cream cheese - 1c icing sugar - 1tbsp butter - 1tsp vanilla, mix mix, ta-da).


     And then, top with the popping candy!~ 


      I call them trick-or-treat cupcakes because if you dont tell folks that the little sprinkles on top are pop rocks they will get a little surprise when they start to eat eat their cupcake!  However!  You can't make them too far in advance or else the candy will just melt into the icing & ruin all the fun!  So try to put the candies on as close to when you are planning to eat them as possible.


     I discovered kinda later that there were 2 different colours, there are actually more, these candies come in 4 flavours: cherry, grape, strawberry & apple.  Cherry, grape & strawberry are all various red shades while apple is green!  I think green is a more halloween-ish colour & the 2 together are kinda christmas-y, so for pottery tomorrow i am going to bring all green!


Monday 27 October 2014

nectarine jam!~

more nectarines!!!
     so, i decided to give jam a try too!  & nectarines seemed like the perfect fruit to do it with.  In my typical style i did research!  Using good old pinterest i must have looked at, gosh, at least 20 different nectarine or nectarine blend jam recipes.  Most of them were quite similar; fruit + sugar + lemon juice + pectin.
     From the start i had decided that i did not want to use pectin, one of the very first recipes i had seen had not used it so i knew it could be done!  Also from very early on i decided that i wanted to use a maceration technique.  This i had only seen on a few pages & knew about from other non jam related baking & cooking & just seemed to me like a good idea.  From the few pages that did use maceration it seemed like it required less sugar in the total recipe which was also something that i was looking for.  So, no pectin, low sugar, those were my 2 main goal, oh yeah, i also wanted to use lime instead of lemon because i had a whole bowl of limes on hand!  None of the recipes that i saw used lime! but i knew it could be done, lime is slightly more acidic than lemon & can be easily substituted in canning, i read this when helping my sister make salsa earlier in the year!
     I had looked at many many different blogs & recipe pages & the amount of sugar to fruit to lemon to pectin varied greatly, so i made my own recipe.  I did not want to add a lot of sugar & i feel that the maceration technique is useful for this (weather this is scientifically correct or not i am sure, but it seems logical) by allowing the fruit to sit and bring out the natural sugars you dont need so much added sugar.  What do i mean by maceration?  Maceration is the process where the sugar (or the syrup the sugar forms on the fruit) breaks down the fruit before you start using it in the jam making process.   I mainly used the process (but not the recipe) described in Prospect: The Pantry's Nectarine Vannila Jam's recipe, i found the page very helpful & informative, so yay! for that.
     For the recipe i needed a combination of nectarine, sugar & lime juice, i decided on 0.8cups sugar & 18mL to every pound of fruit.  (how did i get that?  i figured out the ratio of a crap load of different recipes got rid of the extremes & created an average i was happy with, yeah, its the math-sciencey part of me)
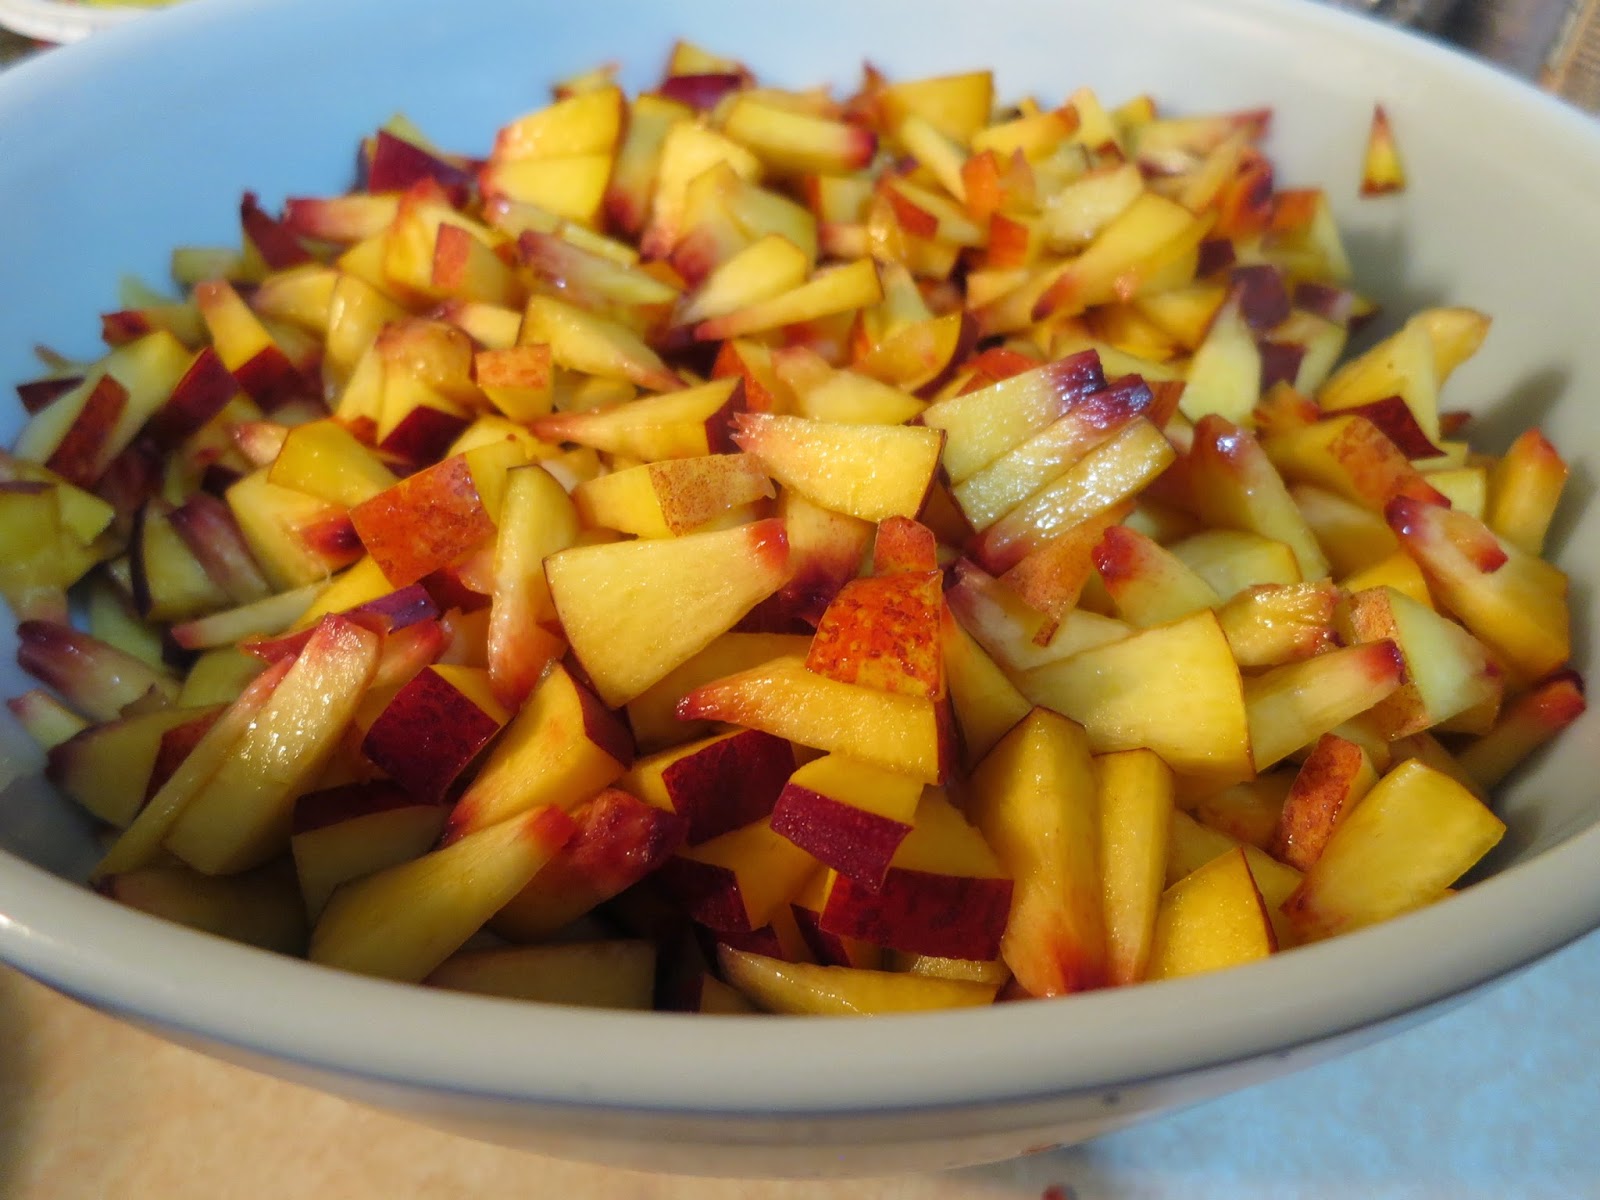
     For this batch i had 7 nectarines!  cut up that equaled 3.15lbs or 1.8kg, so about 2.5cups of sugar & 57mL of lime, 2limes happens to be 60mL perfect! 


      I had my bowl of cut up nectarines, poured the sugar over top & sprinkled the lime juice on & mixed it up a bit.  One way to add a bit of an extra pectin boost is to add the peels & seeds of the lime or lemon you use, i was ready to make a little cheesecloth bag for my lime peel & seeds to stick in with my nectarines during the maceration process but my limes had no seeds, so instead i just stuck the whole lime halves right in there!  I covered the top with wax paper.  I left it on the shelf for a few hours & then stuck it in the fridge overnight after i had a chance to clean out a spot to fit the big bowl!  If you are letting the fruit sit overnight you should refrigerate it.


    Almost 24hours later is when i got a chance to work on this again & it looked like this!  I dont know if the picture is very telling but the nectarine pieces are now swimming in a bowl full of syrupy goodness!
     I drained out the liquid, i had 3cups of it!  As per the instructions on the Prospect: The Pantry site, i worked with just the liquid first.  However, unlike that site (it said under 5min), it took me much much longer.  I had the liquid on med-low heat for 15min and it still had not boiled so i turned it up to med. & after 15 more min it just started to boil!  i turned it up a bit higher to let it boil and after about 8min removed it to do a spoon test.
     The spoon test is a way to determine the jelling of your jam.  To my understanding it works like this:  beforehand you place some spoons in the freezer (because you are gonna probably need more than one), when you think your jam might be ready you get a spoon and place a bit of jam on the spoon, stick it back in the freezer for a min or two till the jam has cooled to room temp. & if it is jelled then it is pretty much good to go, if it is still runny then it needs to be cooked more.

My liquid was jelling pretty good so i returned it to the heat & added the remaining fruit!  I was left with 5.5 cups of fruit after the maceration.  After about about 8min it started to boil again.
     At this point i reduced the heat a bit and started to mash up the fruit with a potato masher.  I wanted my jam to remain chunky though, so not too much mashing!  It turned into this beautiful amazing red colour!  After about another 8min i took it off the heat to do another spoon test & it tested pretty good!  One thing that a lot of sites mentioned that did not happen at all for me was a layer of foam forming on the top of the jam while it cooked, if this happens you are supposed to just skim it off at the end.
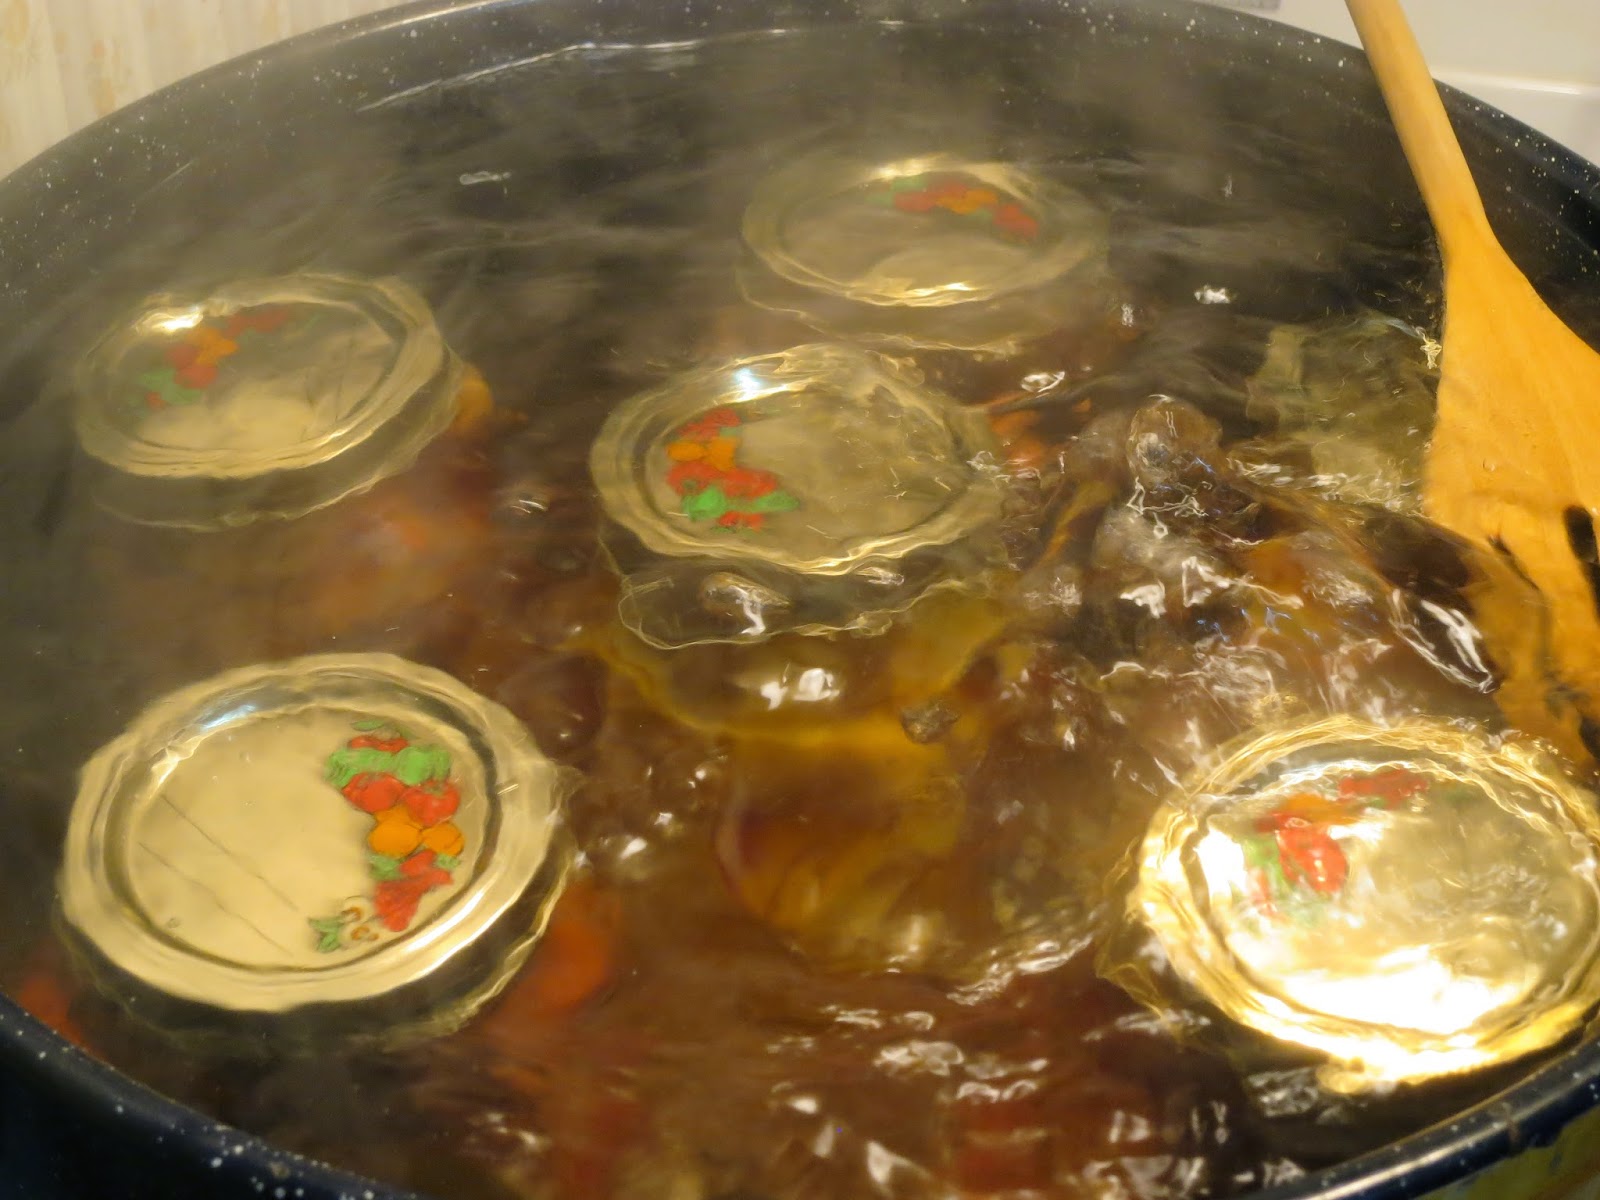
     Canning time!     I had bought these tiny little jars from dollarama.  They are "frutta del prato" jars, i think they are about 125mL?  maybe a different odd type size?  They came in a package of 4 for $2 & are a single piece lid with (i assume) plastisol.  The canning process for these jars is pretty much the same as for 2 piece lids except there is just the one piece & in the middle there is a little indent that pops up when you open it to show that the seal is broken (like store bought jars).  I ended up with 8 little jars of jam!  However, 3 of them did not seal for me at all.


*** 1 jar suddenly unsealed several days later!  my mom happened to be near by & heard a pop & went to investigate or else we might not have realized it until it was too late.  she just stuck it into the fridge to be eaten right away!***
 
 YUM!

Wednesday 22 October 2014

jelly lenses!~

     i got my jelly lenses in the mail yesterday.  In case you don't know, jelly lenses are neat tiny little lenses designed to attach to your phone camera (with a little sticky jelly ring) and allow you to create photos with different effects.  Super cool!


     There are 12 different lenses available (well, 14 because 2 of them come with 2 in one pack) & i bought 5 of them (including the 2 that come with 2).  However!~  I dont own a cell phone!  My plan was to try & stick them on an old digital camera & well, it kinda worked.


     The lenses dont fit perfectly over the camera lens & you can see the circular outline of the jelly lens itself.  But they were cheap & its fun to experiment!  So here it goes!  (If you are planning on getting these to use with your digital camera make sure the sticky stuff doesn't touch your actual camera lens or it might wreck it, ack!)
     So, the lenses i got were:

6 Image Mirage
Heart Frame / Blue Filter
Star Frame / Sepia Filter
Starburst
Spark
     (this is the one i really wanted & it looks like absolutely nothing, but that is because it makes nighttime lights look like stars & this is just a tree outside the window on a gloomy afternoon, oh well.)
     Also available are:
Wide Angle - fish eye effect
Stretch - stretches the photos either horizontally or vertically, like a funhouse mirror
3 Image Mirage - divides one image into 3 (like the 6image one above, but with 3)
Polorizer - achieves a more contrasting sky, reduces glare & reflection,
Close Up - macro effect
Soft Lense - makes photo look more soft & romantic
Vignette - blurs around the edges

     I found that the lens packs that contained 2 (star/sepia & heart/blue) were somehow not as well made? as the other ones, not the lenses themselves, just the way that they closed & packaged the sticky back.  This made them not as sticky as the other ones & they kept falling off.  You also could not really see the heart or the star shape in the picture & that blue is definitely green.   The other ones closed better & stuck better but you only got 1 lens for the same price.
     You can buy these at a lot of different places online for a lot of different prices either singly or in sets, but i got mine from here for about a buck each (& free shipping!) but you had to buy 5 (your choice!).  I think they are pretty swell & hopefully i will get some better pictures with them soon, especially the spark one!  Hopefully i will remember to do a post soon about making your own color lenses too!  Yay for photo experimentation!!!!

Monday 20 October 2014

Canning Nectarines

     My absolute favourite fruit are nectarines!  However, in the winter I have had to do without them & our winters are loooong.  This year I had the fantastic idea to can some!  I suppose I could have froze them, but frozen fruit in the frozen winter just somehow does not have the same appeal.  I am by no means a canning wiz, in fact this is the first time I have ever canned fruit myself (I did get a bit of help from my mom!).
     There is a gazillion + 10 pages of canning how-tos online, so I am pretty much leaving most of that basic info out.  I started with 2 batches of nectarines, one batch was from the states (the redder ones) & one was a batch of BC nectarines (the yellower ones).  I decided to keep them separate just as an experiment.


     After cutting up my nectarines, I had 23 of them & for some reason I don't have the weight written down (and I weigh everything?)?  I do have written that a single jar contained about 294g (about 10oz).  I am not particularly fond of really sweet canned fruit, so I created an extra light syrup by dissolving sugar in water and bringing it to a low boil.  After sterilizing the jars in the hot water boiling in the canner, I packed them with the raw fruit & then filled them with the syrup to a little below the top.  I had ladled a bit of syrup to a measuring cup for easier pouring but there are funnels that you can get to make it even easier (I have one now).  After filling I used a chop stick to poke around in there and push around the fruit to help things settle & get any air bubbles out, if needed I could add another piece of fruit or 2.  Then I wiped the rim with a clean paper towel & put on the 2 part lid which had previously been sitting in a small pot of boiling water, a set of plastic tongs made it easy to get the lid parts out.
     I reused the empty mason jars from classico pasta sauce, which are about 1.25 pints & because I ran out of those, some smaller 1 pint jars.  23 nectarines ended up filling 6 of the larger jars & 3 of the smaller ones with a little bit of fruit left over!  1 large jar required about 1.5cups of syrup.  The jars of fruit looked fantastic!


     The next step was letting the jars boil away in the canner for 20min to allow the magic to happen!


     After removing the jars from the water they have to sit on the shelf undesturbed for a day or so, just to let everything do its stuff, over this time the lids will pop & you have to keep an eye out to make sure that everything has sealed propperly.
     After they boiling, the colouring of the nectarines goes a bit off.  The syrup kinda sucks out all the beautiful bright red colouring from the fruit, so they don't look quite so pretty.  The yellow BC nectarines kinda ended up losing what little red they had all together.


     I am sure however they will still taste fantastic!     Seeing as I only have 6 big & 3 little jars to last me the whole winter (& I am sure I will share) I am going to carefully be rationing these things, so I have not tried any yet.  I will update when I do!


IMPORTANT INFO

extra light syrup recipe:  8cups water to 1cup of sugar

Used 23 Large Nectarines (15US & 8BC)
filled 6 large (1.25pint) jars & 3 small (1pint) jars (5largeUS & 1large+3small BC)
Needed 6cups of syrup
(canned on Sept. 14, 2014)

aprox. nutritional info for 1 large jar
contains aprox. 294g of nectarines & 1.5cups of syrup = 264calories 


Thursday 2 October 2014

post #1. testing testing

ok.  so, i am not sure exactly what this is planning to be?  right now i suppose it's just kinda a scrapbook of things going on in my life.  arts, crafts, baking, photos, random thoughts, etc...  just a place to collect things to look back on & gather ideas.

so there.